Compare commits
23 Commits
644dc626a4
..
master
| Author | SHA1 | Date | |
|---|---|---|---|
|
|
2126960812 | ||
|
|
5613bdb56e | ||
|
|
5db575251e | ||
|
|
6a7828cb9d | ||
|
|
39f0373ef9 | ||
|
|
7945024332 | ||
|
|
3dd1ae9b84 | ||
|
|
3de7867d98 | ||
|
|
2a039dfcf9 | ||
|
|
14688248c2 | ||
|
|
f6ed777b67 | ||
|
|
9261fa0911 | ||
|
|
c8eb654214 | ||
|
|
c6ee4beb11 | ||
|
|
1f85f22e7a | ||
|
|
602932bc00 | ||
|
|
3c5dc3e0c4 | ||
|
|
b8ffeba4bd | ||
|
|
b0232676ce | ||
|
|
75a90ed019 | ||
|
|
b9ffaa7357 | ||
|
|
369521bda2 | ||
|
|
5d31cba56f |
@@ -113,3 +113,5 @@ test/
|
||||
|
||||
output/
|
||||
.aider*
|
||||
|
||||
content/.obsidian/workspace.json
|
||||
|
||||
@@ -28,5 +28,7 @@
|
||||
"canvas": true,
|
||||
"bookmarks": true,
|
||||
"properties": false,
|
||||
"webviewer": false
|
||||
"webviewer": false,
|
||||
"footnotes": false,
|
||||
"bases": true
|
||||
}
|
||||
@@ -1,253 +0,0 @@
|
||||
{
|
||||
"main": {
|
||||
"id": "69e9da393623ab60",
|
||||
"type": "split",
|
||||
"children": [
|
||||
{
|
||||
"id": "59ed96d9876185c9",
|
||||
"type": "tabs",
|
||||
"children": [
|
||||
{
|
||||
"id": "160122bd13ae4b72",
|
||||
"type": "leaf",
|
||||
"state": {
|
||||
"type": "markdown",
|
||||
"state": {
|
||||
"file": "Secret Garden.md",
|
||||
"mode": "source",
|
||||
"source": false
|
||||
},
|
||||
"icon": "lucide-file",
|
||||
"title": "Secret Garden"
|
||||
}
|
||||
},
|
||||
{
|
||||
"id": "238ba022d07a7436",
|
||||
"type": "leaf",
|
||||
"state": {
|
||||
"type": "markdown",
|
||||
"state": {
|
||||
"file": "Fake Dog.md",
|
||||
"mode": "source",
|
||||
"source": false
|
||||
},
|
||||
"icon": "lucide-file",
|
||||
"title": "Fake Dog"
|
||||
}
|
||||
},
|
||||
{
|
||||
"id": "d9a16803d250ddc4",
|
||||
"type": "leaf",
|
||||
"state": {
|
||||
"type": "markdown",
|
||||
"state": {
|
||||
"file": "Secret Garden.md",
|
||||
"mode": "source",
|
||||
"source": false
|
||||
},
|
||||
"icon": "lucide-file",
|
||||
"title": "Secret Garden"
|
||||
}
|
||||
},
|
||||
{
|
||||
"id": "24a62ccdfd18a884",
|
||||
"type": "leaf",
|
||||
"state": {
|
||||
"type": "markdown",
|
||||
"state": {
|
||||
"file": "Custom Air Quality Monitor.md",
|
||||
"mode": "source",
|
||||
"source": false
|
||||
},
|
||||
"icon": "lucide-file",
|
||||
"title": "Custom Air Quality Monitor"
|
||||
}
|
||||
},
|
||||
{
|
||||
"id": "1f1f024283ea8110",
|
||||
"type": "leaf",
|
||||
"state": {
|
||||
"type": "markdown",
|
||||
"state": {
|
||||
"file": "Helios Alpha.md",
|
||||
"mode": "source",
|
||||
"source": false
|
||||
},
|
||||
"icon": "lucide-file",
|
||||
"title": "Helios Alpha"
|
||||
}
|
||||
},
|
||||
{
|
||||
"id": "60389a84493f7fa2",
|
||||
"type": "leaf",
|
||||
"state": {
|
||||
"type": "markdown",
|
||||
"state": {
|
||||
"file": "Hydroponics.md",
|
||||
"mode": "source",
|
||||
"source": false
|
||||
},
|
||||
"icon": "lucide-file",
|
||||
"title": "Hydroponics"
|
||||
}
|
||||
}
|
||||
],
|
||||
"currentTab": 3
|
||||
}
|
||||
],
|
||||
"direction": "vertical"
|
||||
},
|
||||
"left": {
|
||||
"id": "3885f82c1ab72e1b",
|
||||
"type": "split",
|
||||
"children": [
|
||||
{
|
||||
"id": "0e37795504669957",
|
||||
"type": "tabs",
|
||||
"children": [
|
||||
{
|
||||
"id": "e5f5df16367f5f9a",
|
||||
"type": "leaf",
|
||||
"state": {
|
||||
"type": "file-explorer",
|
||||
"state": {
|
||||
"sortOrder": "alphabetical",
|
||||
"autoReveal": false
|
||||
},
|
||||
"icon": "lucide-folder-closed",
|
||||
"title": "Files"
|
||||
}
|
||||
},
|
||||
{
|
||||
"id": "15b64333baa0fbc2",
|
||||
"type": "leaf",
|
||||
"state": {
|
||||
"type": "search",
|
||||
"state": {
|
||||
"query": "",
|
||||
"matchingCase": false,
|
||||
"explainSearch": false,
|
||||
"collapseAll": false,
|
||||
"extraContext": false,
|
||||
"sortOrder": "alphabetical"
|
||||
},
|
||||
"icon": "lucide-search",
|
||||
"title": "Search"
|
||||
}
|
||||
},
|
||||
{
|
||||
"id": "7bdb31d1bda5b8c9",
|
||||
"type": "leaf",
|
||||
"state": {
|
||||
"type": "bookmarks",
|
||||
"state": {},
|
||||
"icon": "lucide-bookmark",
|
||||
"title": "Bookmarks"
|
||||
}
|
||||
}
|
||||
]
|
||||
}
|
||||
],
|
||||
"direction": "horizontal",
|
||||
"width": 200
|
||||
},
|
||||
"right": {
|
||||
"id": "260bba8f76f307a9",
|
||||
"type": "split",
|
||||
"children": [
|
||||
{
|
||||
"id": "21c556d6660f839b",
|
||||
"type": "tabs",
|
||||
"children": [
|
||||
{
|
||||
"id": "528c8f9657044ea2",
|
||||
"type": "leaf",
|
||||
"state": {
|
||||
"type": "backlink",
|
||||
"state": {
|
||||
"file": "Custom Air Quality Monitor.md",
|
||||
"collapseAll": false,
|
||||
"extraContext": false,
|
||||
"sortOrder": "alphabetical",
|
||||
"showSearch": false,
|
||||
"searchQuery": "",
|
||||
"backlinkCollapsed": false,
|
||||
"unlinkedCollapsed": true
|
||||
},
|
||||
"icon": "links-coming-in",
|
||||
"title": "Backlinks for Custom Air Quality Monitor"
|
||||
}
|
||||
},
|
||||
{
|
||||
"id": "79f3ff4100fe3ae6",
|
||||
"type": "leaf",
|
||||
"state": {
|
||||
"type": "outline",
|
||||
"state": {
|
||||
"file": "Custom Air Quality Monitor.md",
|
||||
"followCursor": false,
|
||||
"showSearch": false,
|
||||
"searchQuery": ""
|
||||
},
|
||||
"icon": "lucide-list",
|
||||
"title": "Outline of Custom Air Quality Monitor"
|
||||
}
|
||||
}
|
||||
],
|
||||
"currentTab": 1
|
||||
}
|
||||
],
|
||||
"direction": "horizontal",
|
||||
"width": 300,
|
||||
"collapsed": true
|
||||
},
|
||||
"left-ribbon": {
|
||||
"hiddenItems": {
|
||||
"switcher:Open quick switcher": false,
|
||||
"graph:Open graph view": false,
|
||||
"canvas:Create new canvas": false,
|
||||
"command-palette:Open command palette": false,
|
||||
"markdown-importer:Open format converter": false,
|
||||
"templates:Insert template": false
|
||||
}
|
||||
},
|
||||
"active": "24a62ccdfd18a884",
|
||||
"lastOpenFiles": [
|
||||
"media/airmonitor3.png",
|
||||
"media/airmonitor2.png",
|
||||
"media/Pasted image 20250622165324.png",
|
||||
"media/airmonitor2.png",
|
||||
"media/airmonitor1.jpg",
|
||||
"Sensors.md",
|
||||
"Custom Air Quality Monitor.md",
|
||||
"Protovac Retro Terminal.md",
|
||||
"QotNews.md",
|
||||
"Notica.md",
|
||||
"Spaceport.md",
|
||||
"media/spaceport1.png",
|
||||
"Garage Door Opener.md",
|
||||
"media/protovac1.jpg",
|
||||
"Fake Dog.md",
|
||||
"Bypassing Ports.md",
|
||||
"Backup Strategy.md",
|
||||
"Algae Growth.md",
|
||||
"t0 Services.md",
|
||||
"Solar Car.md",
|
||||
"Protospace.md",
|
||||
"Helios Alpha.md",
|
||||
"Hand of Ozymandias.md",
|
||||
"Airflow.md",
|
||||
"media/protovac1.png",
|
||||
"media/fake-dog.jpg",
|
||||
"media/dress1.jpg",
|
||||
"media/cookies2.jpg",
|
||||
"Acoustic Panels.md",
|
||||
"About.md",
|
||||
"Hydroponics Log 3.md",
|
||||
"Hydroponics Log 2.md",
|
||||
"Hydroponics Log 1.md",
|
||||
"pages/writing.md",
|
||||
"pages/projects.md",
|
||||
"pages/creations.md"
|
||||
]
|
||||
}
|
||||
@@ -0,0 +1,33 @@
|
||||
Title: Bash Register
|
||||
Date: 2026-01-25
|
||||
Category: Creations
|
||||
Summary: An old cash register with a thermal receipt printer.
|
||||
Image: bash-register1.jpg
|
||||
Tags: feed
|
||||
Guid: 6836532b386642b9879f71f08e5d821f
|
||||
|
||||
The Bash Register is an old cash register that my friend and I stuck a Raspberry Pi Linux computer into. It's connected to a thermal receipt printer that prints images sent from the member portal [[Spaceport]] running at my local makerspace, [[Protospace]].
|
||||
|
||||
![[bash-register1.jpg]]
|
||||
|
||||
Protospace members are able to draw images on the portal:
|
||||
|
||||
![[bash-register2.jpg]]
|
||||
|
||||
Draw controls include colour, eraser, size, shade, undo history, and reset. The current drawing is stored in local storage so it doesn't get lost if the user accidentally navigates away.
|
||||
|
||||
Once a drawing is submitted, its filename is sent to the Raspberry Pi via MQTT. A simple [Python script](https://git.tannercollin.com/tanner/bashregister/src/branch/master/main.py) listens for the message and then immediately downloads and prints it.
|
||||
|
||||
All drawings are added to a gallery that can be publicly viewed [here](https://my.protospace.ca/gallery):
|
||||
|
||||
![[bash-register3.png]]
|
||||
|
||||
## Printing Garbage Bug
|
||||
|
||||
While developing the code, I was having an issue where every second print would output several inches of garbage characters instead of the image. After hours of debugging it seemed related to the height of the image being printed. I used `git bisect` to narrow it down to a commit where the canvas's height was changed.
|
||||
|
||||
It turned out to be a bug with the printer that happens when printing images with a height that's a multiple of 96 pixels tall:
|
||||
|
||||
<https://github.com/python-escpos/python-escpos/issues/367>
|
||||
|
||||
The fix for this was simply adjusting the aspect ratio of the canvas on the portal.
|
||||
@@ -0,0 +1,27 @@
|
||||
Title: Camper Trailer
|
||||
Date: 2026-04-15
|
||||
Category: Creations
|
||||
Summary: A custom square drop camper trailer.
|
||||
Image: camper1.jpg
|
||||
|
||||
I built a "square drop" camper trailer out of plywood on an existing metal trailer frame at [[Protospace]]. It took eight work days to build over a three-week period in August 2025.
|
||||
|
||||
![[camper1.jpg]]
|
||||
|
||||
The camper is approximately 6' wide, 8' long, and 4' high above the trailer frame. The cabin is 6' x 6' and has an RV door (from Amazon), a roof vent, a small vent fan, and a phone charger. The back hatch galley is 2' deep and has some cabinets, a counter top, a sink that drains below to a bucket, and a slide-out tray for my cooler.
|
||||
|
||||
The walls are 5/8" plywood on a 2x2" stud frame that sits on a 3/4" plywood base. It was built on an existing flat deck trailer frame that my friend Robb gave me.
|
||||
|
||||
The vertices are fibreglassed <span class="aside"> (would not do fibreglass again)</span> and the exterior is painted with green porch paint that gives it a thick, rough texture. The hatch has weather stripping, the door has butyl, and the roof vent has lap sealant. The hatch also doubles as an awning that I can sit under while it rains.
|
||||
|
||||
The electronics are powered by a 40 Ah lithium iron phosphate battery that I manually charge before the trip. I plan to add a small solar panel next summer. The cabin and galley are lit by separate warm high-density LED strips on dimmers. They were positioned to be as diffuse as possible.
|
||||
|
||||
I took the trailer on a camping trip at the end of August and it ended up being too cold. It definitely needs insulation. My plan is to insulate the frame with XPS foam and cover it with veneer. If that's not enough I'll install a small diesel heater.
|
||||
|
||||
Here's the inside of the cabin:
|
||||
|
||||
![[camper2.jpg]]
|
||||
|
||||
Here's the galley, in use, at night:
|
||||
|
||||
![[camper3.jpg]]
|
||||
@@ -0,0 +1,132 @@
|
||||
Title: Hacking my Air Purifier onto Wifi
|
||||
Date: 2026-05-27
|
||||
Category: Creations
|
||||
Summary: Hardware hacking my Airmega 200M Purifier onto Wifi.
|
||||
Image: purifier1.jpg
|
||||
Wide: true
|
||||
|
||||
My Airmega 200M air purifier has four speed settings: useless, less useless, annoying and SCREAMING BANSHEE. I was able to connect an ESP8266 Arduino to the motor driver board and get direct fine-grained control of the speed over Wifi. I use this to vary the speed based on my distance to the air purifier so I don't have to listen to it.
|
||||
|
||||
![[purifier1.jpg]]
|
||||
|
||||
## Home Automation
|
||||
|
||||
I use motion sensors to control the lights in my house, so my home automation system somewhat has an idea of what room I'm in. I use this data to control the purifier's speed based on how far away I am from it. If I'm on the same floor, it runs very quietly (~12% power). If I'm one floor away, it runs at 50%. If I'm two floors away (or I'm not home), it runs at 100%.
|
||||
|
||||
I live alone, but my automation system has a "Guest Mode" which prevents the motion sensors from turning lights off. If this mode is enabled, the purifier only runs quietly.
|
||||
|
||||
I didn't want to get a different air purifier that was smart and have to deal with some app or let a random smart device onto my network.
|
||||
|
||||
## Technical Details
|
||||
|
||||
The power supply and motor driver board originally connect to a board that has the buttons and LEDs via a 6-pin ribbon cable. Pin 4 of that cable expects a PWM signal that controls the speed of the purifier's blower motor proportional to the duty cycle. Pins 1 and 5 happen to be 5 V and Ground, which are used to power the Wemos D1 Mini ESP8266.
|
||||
|
||||
The Wemos boots up and connects to an MQTT broker on my Wifi network. It subscribes to the `iot/purifier/mega_1234/speed` topic where `1234` is part of the MAC address so different purifiers on the network can be addressed easily. It listens to messages that are numbers 0-100 and maps them linearly to 60-140 which correspond to the PWM duty cycle range that the motor driver expects.
|
||||
|
||||
You can find the [source code](https://git.tannercollin.com/tanner/airmega-hack/src/branch/master/firmware/firmware.ino) on my Gitea.
|
||||
|
||||
An unfortunate side effect of this is that the control board is completely dead and manual control of the purifier no longer works except for unplugging it. I actually don't mind this because it also kills the blue LEDs and I just use my smart watch or phone to control it instead. The built-in dust sensor also no longer works, but it should be possible to also read this with the Arduino over serial in the future. I discuss this further down.
|
||||
|
||||
## Hardware Hacking
|
||||
|
||||
Hacking the purifier is actually fairly straightforward. My purifier was already over a year old, so I didn't care about voiding my warranty. The power supply isn't isolated and the electronics' ground is floating at something like 48 VAC (learned this the hard way), so I keep it unplugged while I'm modifying it.
|
||||
|
||||
I removed the cover and all the filters, and then the nine Phillips screws holding the case together. I lifted the blower half up and propped it up at an angle. You can see a photo of it below, with the ribbon cable plugged into the control board at the bottom right:
|
||||
|
||||
![[purifier2.jpg]]
|
||||
|
||||
I didn't want to destroy the cable by cutting it to connect it to the Arduino, so I ordered some connectors off of Digikey. Both [25SH-B-06-TR](https://www.digikey.ca/short/mt9d2cm0) and [51125-06-0200-01](https://www.digikey.ca/short/v53bnq97) mate well with the white ribbon cable connector. I soldered the connector to a bit of 0.1" perf board and wired it to the Arduino:
|
||||
|
||||
![[purifier3.jpg]]
|
||||
![[purifier4.jpg]]
|
||||
|
||||
The wiring is:
|
||||
|
||||
```
|
||||
Wemos Cable
|
||||
5V - Pin 1 (white)
|
||||
G - Pin 5
|
||||
D1 - Pin 4
|
||||
```
|
||||
|
||||
I then simply unplugged the control board, plugged in my perf board connector, and secured it with some of the tape inside the purifier as you can see in the first photo. I reassembled the case and reinstalled the filters.
|
||||
|
||||
## Research
|
||||
|
||||
Researching the hack was not as straightforward. I disassembled the unit and noticed the blower motor was wired to the same board where the power supply was. I then saw the ribbon cable between that board and the control board, so chose to target it first. The pins were labelled on the board's silkscreen and I soldered some jumper cables to the back so I could scope them easier.
|
||||
|
||||
![[purifier5.jpg]]
|
||||
|
||||
I attached my oscilloscope's ground lead to the `GND_S` pin and probe to the `SIG1` pin, expecting that to be a signal. I plugged the purifier in and immediately heard a POP! That's when I learned the power supply isn't isolated and I had just shorted 48 volts through my oscilloscope to ground.
|
||||
|
||||
Luckily I only blew a fuse on the board and just had to solder a new one on, part number [MST 3.15A 250V](https://www.digikey.ca/short/nv9wtwr9). Then I switched to using two probes. One on the signal and one on the ground pin and used my oscilloscope's math feature to subtract them. This made a noisy and imprecise trace, but it was enough to tell the speed was controlled by PWM on Pin 4.
|
||||
|
||||
This showed me the hack was indeed possible, so I ordered a differential probe off Amazon in order to scope the signals precisely:
|
||||
|
||||
- Pin 1 (+5V_1A, white) is pretty clean 5.3 V always
|
||||
- Pin 2 (SIG1) doesn't seem like anything
|
||||
- Pin 3 (CON3-2) is speed tach. 50% duty cycle, period widens as it gets slower
|
||||
- low speed: 80 Hz
|
||||
- medium speed: 119 Hz
|
||||
- high speed: 200 Hz
|
||||
- Pin 4 (CON3-3) is speed control PWM 0-5 V, higher duty cycle for more speed
|
||||
- low speed: 6.8% duty cycle
|
||||
- medium speed: 8.1% duty cycle
|
||||
- high speed: 13.7% duty cycle
|
||||
- Pin 5 (GND_S) ground, floats 48 VAC above mains ground
|
||||
- Pin 6 (15VON/OFF) is 1.5 V when machine is off, noisy 5.3 V when running
|
||||
|
||||
I wrote a quick Arduino sketch to see if the 0-3.3 V PWM it outputs was enough to control the speed and it was. This, combined with the fact there's 5 V supplied by the ribbon cable meant that the Arduino could be connected simply with three wires, without the need for level shifters or a power supply.
|
||||
|
||||
I ordered 17 different 6-pin connectors with the same pitch off Digikey and tested each one until I was satisfied with the fit. I programmed the Arduino, soldered it all up, and the hack was complete! I've been using it for almost a year now.
|
||||
|
||||
## Future Improvements
|
||||
|
||||
As I mentioned before, it should be possible to communicate directly with the integrated particulate sensor over its cable. I didn't bother to do this because I already had my own [[Custom Air Quality Monitor]] running. The sensor data could then be used as feedback to control the blower speed, similar to the built in functionality. The blower's speed could be ramped up gradually now that fine-grain control of the speed is possible.
|
||||
|
||||
The control board is completely disabled after doing this hack which might be inconvenient for house guests or spouses. An improvement could be using the Arduino to intercept the speed control signal instead by putting it in the middle. It could read the control board's PWM signal by timing the pulse width, or as a voltage on one of its analog pins after low-pass filtering it. Then whenever there's a change to the MQTT speed or control board speed, output the latest value.
|
||||
|
||||
## Appendix: Home Assistant
|
||||
|
||||
I don't actually use Home Assistant for this, but here's how one could configure it. This assumes you have an MQTT broker (ie. mosquitto) running. If you don't, Home Assistant can be configured to run a broker by installing the Mosquitto broker add-on from the Add-on Store.
|
||||
|
||||
### Set up MQTT
|
||||
|
||||
Go to Settings > Devices & Services > MQTT > Configure > Re-configure MQTT.
|
||||
|
||||
Enter your MQTT broker details. If you are using the broker add-on, it should be automatically discovered.
|
||||
|
||||
### Add the Slider
|
||||
|
||||
1. Go to Settings > Devices & Services > Helpers
|
||||
2. Click + Create Helper (bottom right) and select Number
|
||||
3. Set the Name (like "Purifier Speed") and Icon (I used "mdi:air-purifier")
|
||||
4. Set Minimum value to 0 and Maximum value to 100
|
||||
5. Click Create
|
||||
|
||||
Note the Entity ID of the slider. Mine is "input_number.purifier_speed".
|
||||
|
||||
### Add the Automation
|
||||
|
||||
Go to Settings > Automations & Scenes > + Create Automation > Create new automation.
|
||||
|
||||
You can do this with the UI but I prefer entering YAML code. Click the three dots at the top right and select "Edit in YAML". Paste this in:
|
||||
|
||||
```
|
||||
trigger:
|
||||
- platform: state
|
||||
entity_id: input_number.purifier_speed
|
||||
action:
|
||||
- service: mqtt.publish
|
||||
data:
|
||||
topic: "iot/purifier/mega_1234/speed"
|
||||
payload: "{{ states('input_number.purifier_speed') | int }}"
|
||||
```
|
||||
|
||||
Note that `input_number.purifier_speed` has to match the Entity ID of the slider and `mega_1234` should be changed to the ID the purifier Arduino reports over serial after programming.
|
||||
|
||||
Hit save and call it something like "Purifier automation". The slider should now be on your dashboard under a "Helpers" section.
|
||||
|
||||
---
|
||||
|
||||
AI disclosure: None of this article's content or prose was written by AI. The Arduino code that runs on the ESP8266 was written by Gemini.
|
||||
@@ -3,7 +3,8 @@ Date: 2025-06-14
|
||||
Category: Creations
|
||||
Summary: A retro dumb terminal interface at my local makerspace.
|
||||
Image: protovac1.jpg
|
||||
xTags: feed
|
||||
Tags: feed
|
||||
Guid: 0e0f9b63f1344aefbf6fce80f6e813ee
|
||||
|
||||
Protovac is a retro dumb terminal interface that lives at my local makerspace, [[Protospace]]. Its main use is printing storage labels and name tags for members and guests when they visit.
|
||||
|
||||
|
||||
@@ -11,7 +11,7 @@ These graphs are live and generated every 10 minutes, assuming the script works:
|
||||
|
||||
Black: power (W), green: energy (kWh)
|
||||
|
||||
|
||||
|
||||
|
||||
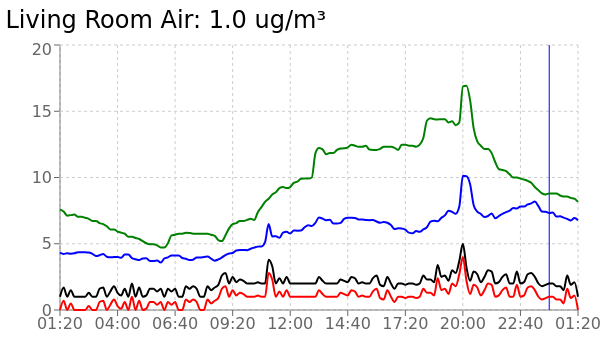
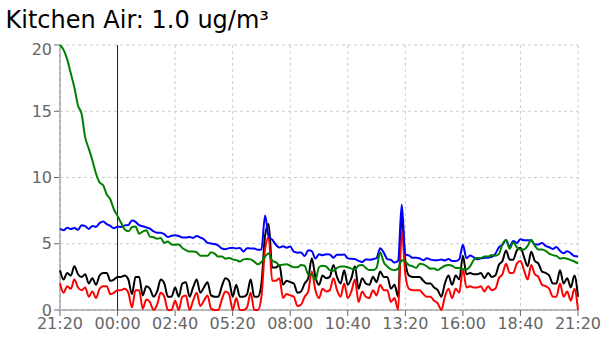
Black: PM10 (ug/m³), red: PM2.5 (ug/m³), blue: CO₂ (ppm), green: VOC
|
||||
|
||||
@@ -43,7 +43,7 @@ Black: total (MJ), green: delta (MJ)
|
||||
|
||||
Black: total (L), green: delta (L)
|
||||
|
||||
|
||||
|
||||
|
||||
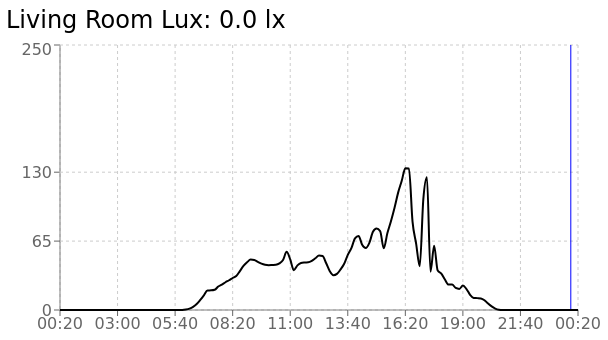
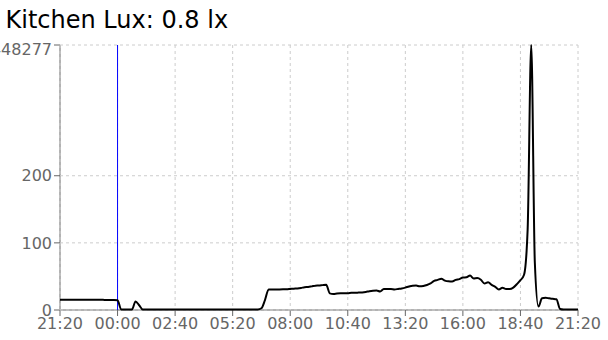
Black: light (lx)
|
||||
|
||||
@@ -61,6 +61,6 @@ The data gets collected by a central Python script that process and stores it in
|
||||
|
||||
## InfluxDB Regrets
|
||||
|
||||
My biggest regret was using InfluxDB. It's a stupid database that I wouldn't recommend it to anyone. I ran into timezone issues with `group by time()`. It assumes the column data type is an integer if your sensor happens to send it a whole number at first and it won't let you change it. Their docs are a confusing mess. They dropped the SQL-like InfluxQL syntax for querying with a pipeline-like syntax called Flux in version 2.0. Debian's repos seem to be staying with version 1.x though. You can only delete data by time ranges, not values. It also logs every single thing to `/var/log/syslog` and there's no easy way to disable it (completely). They shut down InfluxDB cloud in Belgium and [didn't warn customers](https://community.influxdata.com/t/getting-weird-results-from-gcp-europe-west1/30615/7) before deleting all their data. They changed schemas again in version 3.x and made useful features closed-source. Read the comments [here](https://news.t0.vc/TUTF/c#doctoboggan1750217574).
|
||||
My biggest regret was using InfluxDB. It's a stupid database that I wouldn't recommend to anyone. I ran into timezone issues with `group by time()`. It assumes the column data type is an integer if your sensor happens to send it a whole number at first and it won't let you change it. Their docs are a confusing mess. They dropped the SQL-like InfluxQL syntax for querying with a pipeline-like syntax called Flux in version 2.0. Debian's repos seem to be staying with version 1.x though. You can only delete data by time ranges, not values. It also logs every single thing to `/var/log/syslog` and there's no easy way to disable it (completely). They shut down InfluxDB cloud in Belgium and [didn't warn customers](https://community.influxdata.com/t/getting-weird-results-from-gcp-europe-west1/30615/7) before deleting all their data. They changed schemas again in version 3.x and made useful features closed-source. Read the comments [here](https://news.t0.vc/TUTF/c#doctoboggan1750217574).
|
||||
|
||||
Just stick to SQLite or Postgres.
|
||||
|
||||
@@ -0,0 +1,16 @@
|
||||
Title: Three Drawer Cabinet
|
||||
Date: 2025-03-18
|
||||
Category: Creations
|
||||
Summary: A three-drawer cabinet with a laser etched design.
|
||||
Image: cabinet1.jpg
|
||||
xTags: feed
|
||||
|
||||
I built a three drawer cabinet for storing embroidery machine supplies at my local makerspace, [[Protospace]]. It was built to fit under the machine, inside its metal stand.
|
||||
|
||||
![[cabinet1.jpg]]
|
||||
|
||||
The side features a laser etched flower design I found online. The cabinet is assembled using pocket screws because I wanted to learn how to use them.
|
||||
|
||||
Here's what it looks like installed:
|
||||
|
||||
![[cabinet2.jpg]]
|
||||
|
After Width: | Height: | Size: 1.4 KiB |
@@ -0,0 +1 @@
|
||||
<svg fill="none" height="300" stroke="#000" stroke-linecap="square" stroke-width="28" width="300" xmlns="http://www.w3.org/2000/svg"><path d="M201.962 210a60 60 0 10-103.924-60l-50 86.603M98.038 210a60 60 0 10103.924-60l-50-86.603M150 120a60 60 0 100 120h100"/></svg>
|
||||
|
After Width: | Height: | Size: 268 B |
|
After Width: | Height: | Size: 236 KiB |
|
After Width: | Height: | Size: 84 KiB |
|
After Width: | Height: | Size: 316 KiB |
|
After Width: | Height: | Size: 560 KiB |
|
After Width: | Height: | Size: 339 KiB |
|
After Width: | Height: | Size: 641 KiB |
|
After Width: | Height: | Size: 244 KiB |
|
After Width: | Height: | Size: 446 KiB |
|
After Width: | Height: | Size: 162 KiB |
|
After Width: | Height: | Size: 154 KiB |
|
After Width: | Height: | Size: 169 KiB |
|
After Width: | Height: | Size: 182 KiB |
|
After Width: | Height: | Size: 201 KiB |
@@ -2,6 +2,11 @@
|
||||
# -*- coding: utf-8 -*- #
|
||||
from __future__ import unicode_literals
|
||||
|
||||
import sys
|
||||
sys.path.append('.')
|
||||
|
||||
import generate_thumbnails
|
||||
|
||||
PATH = 'content'
|
||||
|
||||
TIMEZONE = 'Canada/Mountain'
|
||||
@@ -33,6 +38,7 @@ MARKDOWN = {
|
||||
PLUGINS = [
|
||||
'obsidian',
|
||||
'linkclass',
|
||||
'generate_thumbnails',
|
||||
]
|
||||
|
||||
STATIC_PATHS = ['media', 'extra']
|
||||
|
||||
@@ -2,7 +2,7 @@
|
||||
|
||||
{% block meta %}
|
||||
<title>{{ article.title|striptags }} | t0.vc</title>
|
||||
<link rel="canonical" href="https://tannercollin.com/{{ article.slug }}/" />
|
||||
<link rel="canonical" href="https://tanner.vc/{{ article.slug }}/" />
|
||||
{% if article.date %}
|
||||
<meta name="date" content="{{article.date}}" />
|
||||
{% endif %}
|
||||
|
||||
@@ -50,10 +50,6 @@
|
||||
height: auto;
|
||||
color-scheme: light;
|
||||
}
|
||||
.floated {
|
||||
float: left;
|
||||
margin-right: 1rem;
|
||||
}
|
||||
@media screen and (min-width:63rem) {
|
||||
.content .aside {
|
||||
display: inline;
|
||||
|
||||
@@ -12,13 +12,13 @@ Lead Hardware Engineer - Critical Control, '16-'18
|
||||
Electrical Engineer - Pivotal Aero, '16-'16
|
||||
BSc Electrical Engineering - University of Calgary
|
||||
|
||||
Blog
|
||||
Creations
|
||||
|
||||
<a href=6>Makerspace Tours
|
||||
<a href=p>Bypassing ISP Blocked Ports
|
||||
<a href=j>Japan Photography
|
||||
<a href=h>Hydroponics
|
||||
<a href=x>[more]</a>
|
||||
<a href=5>Camper Trailer
|
||||
<a href=3>Bash Register
|
||||
<a href=0>Protovac Terminal
|
||||
<a href=7>Fake Dog for Home Security
|
||||
<a href=z>[more]</a>
|
||||
|
||||
Projects
|
||||
|
||||
@@ -28,10 +28,10 @@ Projects
|
||||
<a href=n>Notica
|
||||
<a href=y>[more]</a>
|
||||
|
||||
Creations
|
||||
Blog
|
||||
|
||||
<a href=7>Fake Dog for Home Security
|
||||
<a href=5>Garage Door Opener Hack
|
||||
<a href=3>Theatre Acoustic Panels
|
||||
<a href=0>Wine Crate Coffee Table
|
||||
<a href=z>[more]
|
||||
<a href=h>Hydroponics
|
||||
<a href=j>Japan Photography
|
||||
<a href=p>Bypassing ISP Blocked Ports
|
||||
<a href=6>Backup Strategy
|
||||
<a href=x>[more]
|
||||
|
||||
@@ -32,10 +32,17 @@
|
||||
</div>
|
||||
|
||||
<p class="footer">
|
||||
<span class="wname">Webring:</span> <a href="https://nice42q.de/" class="wprev">< Previous</a> | <a href="https://webring.t0.vc" class="windex">Index</a> | <a href="https://udia.ca" class="wnext">Next ></a>
|
||||
<span class="wname">Webring:</span> <a href="https://www.rottenwheel.com" class="wprev">< Previous</a> | <a href="https://webring.t0.vc" class="windex">Index</a> | <a href="https://udia.ca" class="wnext">Next ></a>
|
||||
</p>
|
||||
|
||||
<p class="xxiivv">
|
||||
<a href="https://webring.xxiivv.com/#tanner" target="_blank" rel="noopener">
|
||||
<img src="/extra/xxiivv-icon.black.svg" alt="XXIIVV webring"/>
|
||||
</a>
|
||||
</p>
|
||||
|
||||
<p class="footer">
|
||||
© 2012–2022 Tanner
|
||||
© 2012–2025 Tanner
|
||||
</p>
|
||||
</body>
|
||||
</html>
|
||||
|
||||
@@ -104,6 +104,19 @@
|
||||
text-align: center;
|
||||
}
|
||||
|
||||
.xxiivv {
|
||||
text-align: center;
|
||||
}
|
||||
|
||||
.xxiivv img {
|
||||
width: 30px;
|
||||
height: 30px;
|
||||
}
|
||||
|
||||
.xxiivv a {
|
||||
border-bottom: none;
|
||||
}
|
||||
|
||||
.toc {
|
||||
float: right;
|
||||
padding: 0.75rem;
|
||||
@@ -143,9 +156,10 @@
|
||||
}
|
||||
|
||||
.content img {
|
||||
width: 100%;
|
||||
max-width: 36rem;
|
||||
max-width: min(100%, 36rem);
|
||||
max-height: 36rem;
|
||||
height: auto;
|
||||
width: auto;
|
||||
display: block;
|
||||
margin: 0 auto;
|
||||
}
|
||||
@@ -257,4 +271,8 @@
|
||||
.nofilter img {
|
||||
filter: initial !important;
|
||||
}
|
||||
|
||||
.xxiivv img {
|
||||
filter: invert(1);
|
||||
}
|
||||
}
|
||||
|
||||